This is the documentation of JSU for Jira Server/Data Center. If you are using JSU on Jira Cloud, you can find the documentation here.
Requires JSU 2.0+
![]() Avoid manual creation of repeated issue fields across linked issues.
Avoid manual creation of repeated issue fields across linked issues.
Have you ever wished value fields of an origin issue can be copied automatically to its linked issues? Your wish is our command!
Let's say you are a Hiring Manager and you are onboarding a new Marketing Assistant.
Your tasks to complete the onboarding would then include
- Create new contract
- Order new computer
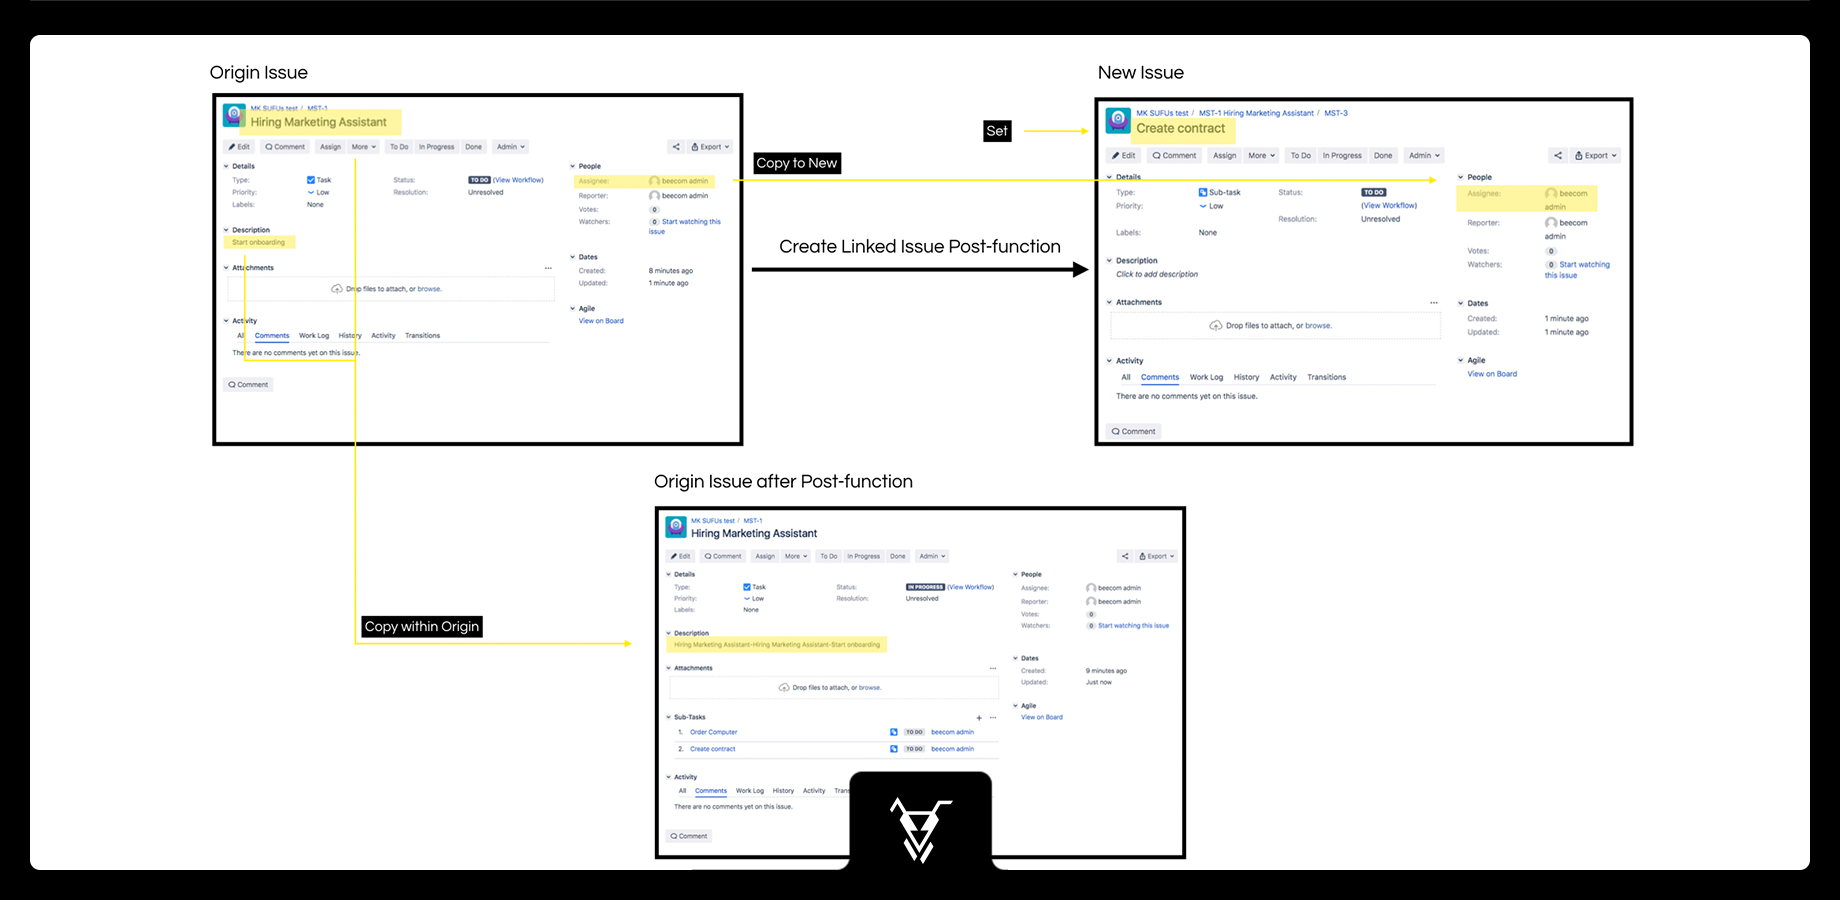
First, you create your origin issue which you’ll call Hiring a Marketing Assistant. Instead of manually creating linked issues and copying field values,
JSU’s Set of Operations can help automate these tasks. These operations can do three things:
- Copy a field value from the origin issue to a new linked issue
- Copy the value from one field to another field within the origin issue, and
- New! Set value of a field in a new linked issue
Check out the "How to" video further below to configure your budget approval automation.
How to configure this workflow
- Go to your project settings and choose the Workflows option from the left navigation. Then edit your workflow. We will perform our automation on the "in progress" transition, so when the task turns to in progress, 2 sub-tasks will automatically be created! Choose the "in progress" transition and switch to the post functions tab to add a post function
- Select the "Create linked issue" post function by JSU and click the add button below. In this use case, you do not need any preconditions, so you can ignore this part. You want your automation to perform inside the same project. And you want your new issue to be related via Sub-Task. You can choose whatever issue type you want but in this case, choose Sub-Task.
- Time for a little magic now! You can configure the value of different fields by clicking on "Add configuration". You can copy a field value from the origin issue to the new issue or within the origin issue. You can also set a field value to a field in the new issue. In this case, the origin issue is our task and the new issue is the sub-task. First, you can copy a field from the origin to the new issue. Let's copy the assignee of the task to the assignee of the sub-task. Then, you can copy a value from a field of the origin issue to another field of the origin issue. We'll try it by copying the summary to the description prepending it with a dash. Configure the last operation by setting a value for the summary of the new issue. We'll set it to "Create contract". Finish by adding your post function.
- Follow the same process to have one more sub-task created for ordering a PC. Add the create linked issue post function and configure the value of the fields you prefer. Set the summary of your new issue to "order PC" add your post function and publish your workflow.
- Go to your project and create a task for hiring a Marketing Assistant. Edit the assignee and the description of your task and put it in progress.
- The JSU post function automatically created 2 subtasks for you! The description of your task is updated because of the "copy within origin" functionality. Your new sub-tasks have been assigned to the assignee of the task due to the "copy to new" functionality and their summary is set as configured by the "set" functionality. That's it! JSU automated the work for you!
How to video
Watch this video to see all of this in action*:
This was only a bit of JSU in action. Subscribe to our YouTube channel and Access more JSU use cases.
See also the app documentation for some more examples and configuration screenshots.
*The video is created on the Jira Cloud environment.
Need more Information or help? Get in touch!