This is the documentation of JSU for Jira Cloud. If you are using JSU on Jira Server or on Jira Data Center, you can find the documentation here.
Description
This post function will create a new issue. The new issue will be linked to the origin issue (the one, which triggered the 'Create a Linked Issue' post function).
Any number of fields can be copied to the new issue and within the origin issue.
See the Testing and Fixing Bugs use case for an example how several of our customers are using this post function. The video on that page shows you the following sample configuration in action.
Configuration
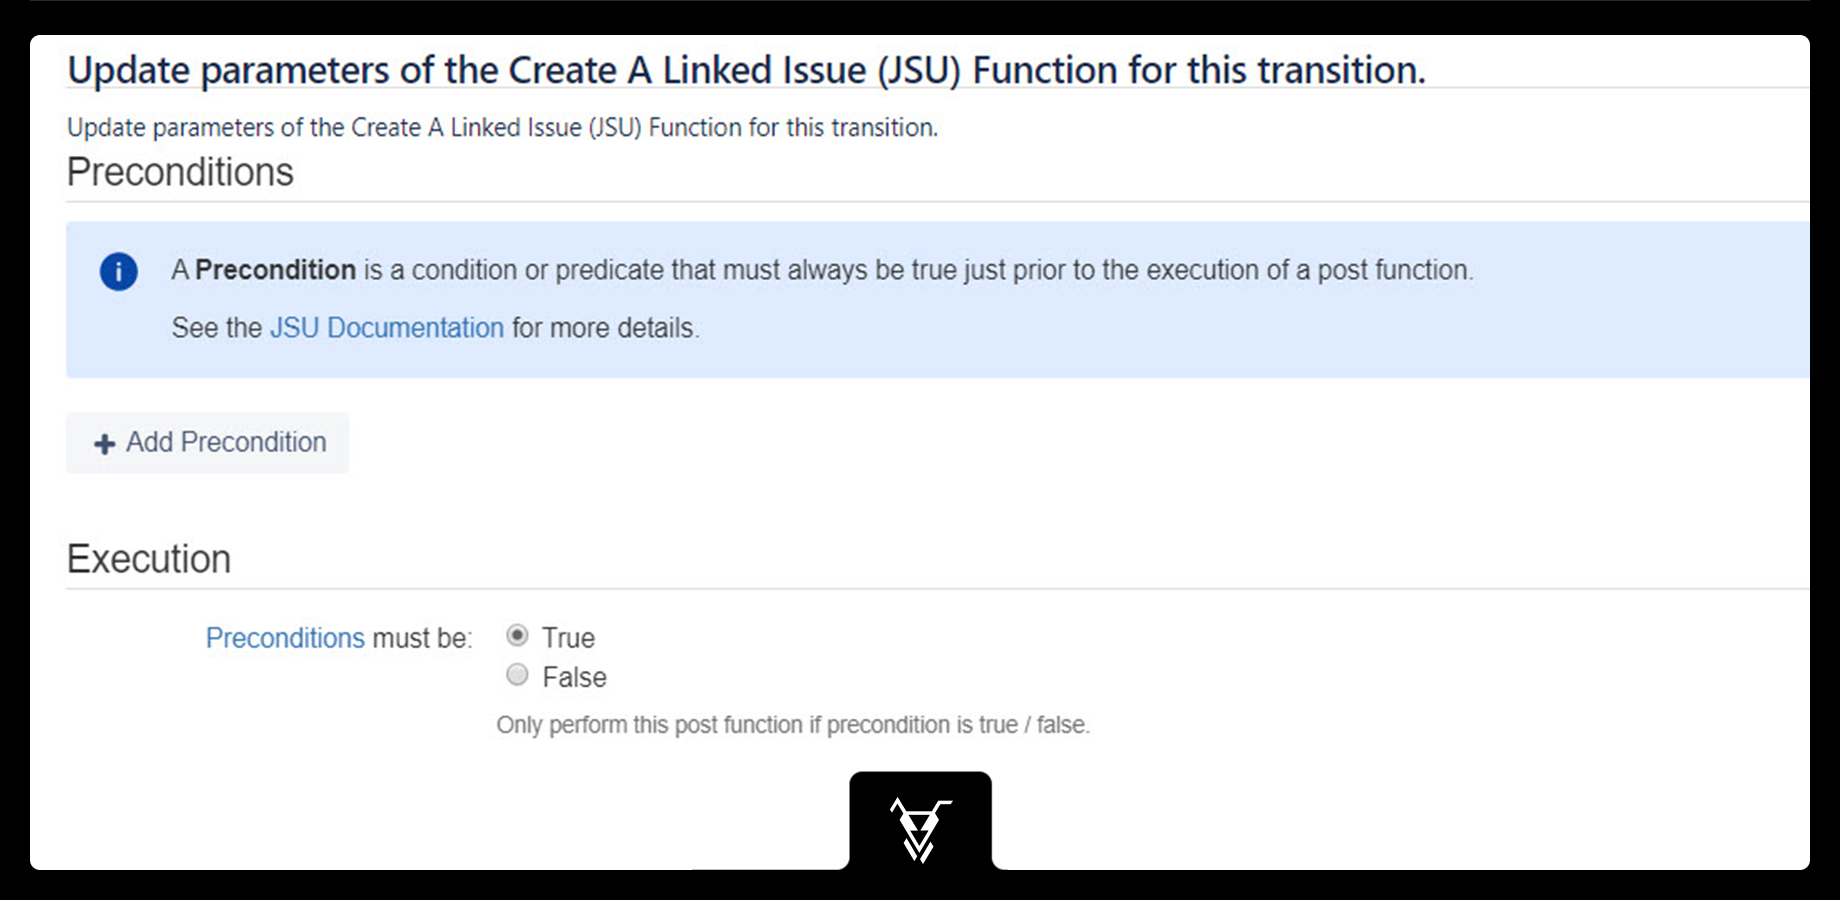
Precondition
When using preconditions, they can be evaluated in the context of a post function in the following ways:
True (Precondition must be true to execute a post function)
False (Precondition must be false to execute a post function)

You can learn more about our preconditions in the Workflow Preconditions topics.
Initial Mandatory Values for the new Issue
Here you must configure some always mandatory fields for an issue. These are some real basic field of Jira. Be aware that your Jira configuration might have additional required fields (you should set them all by Copy Field Section) .
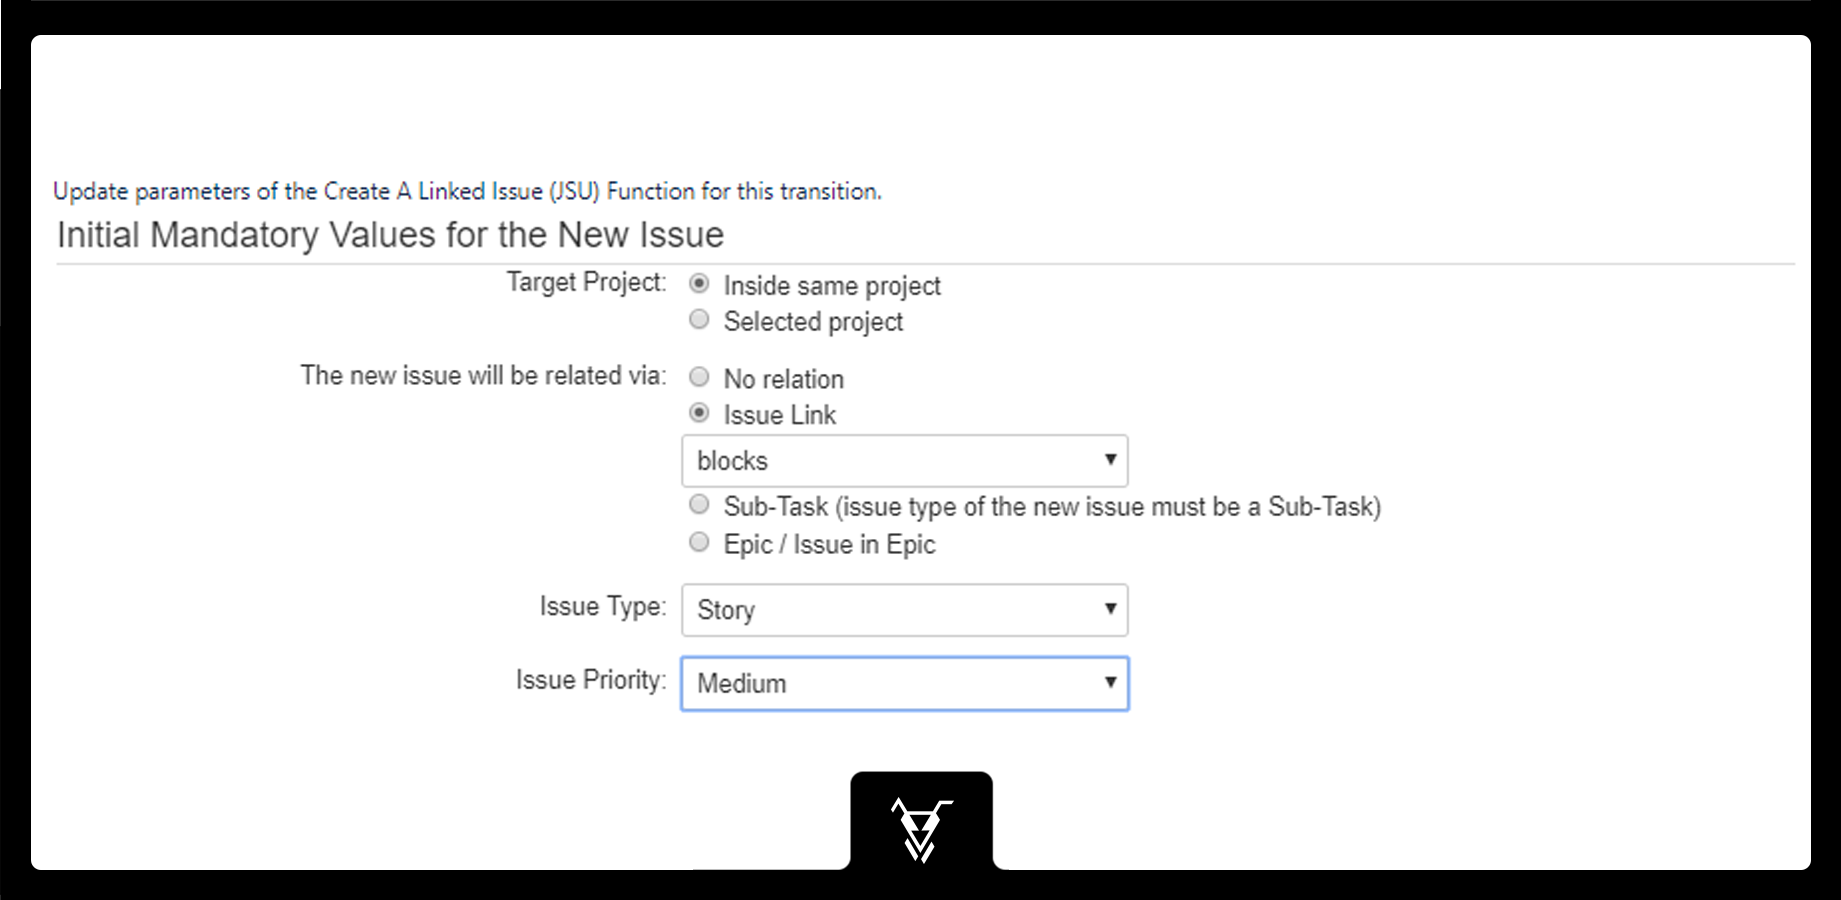
Additionally the summary will always be copied from the origin issue to the new issue. The reporter of the new issue will always be set to the user who triggered the current transition (and thus this post function). However you might overwrite them again later with Copy from the Origin Issue to the New Issue
Target Project
Target Project can be set to:
Inside same project
A new issue will be created in this same project
Selected Project
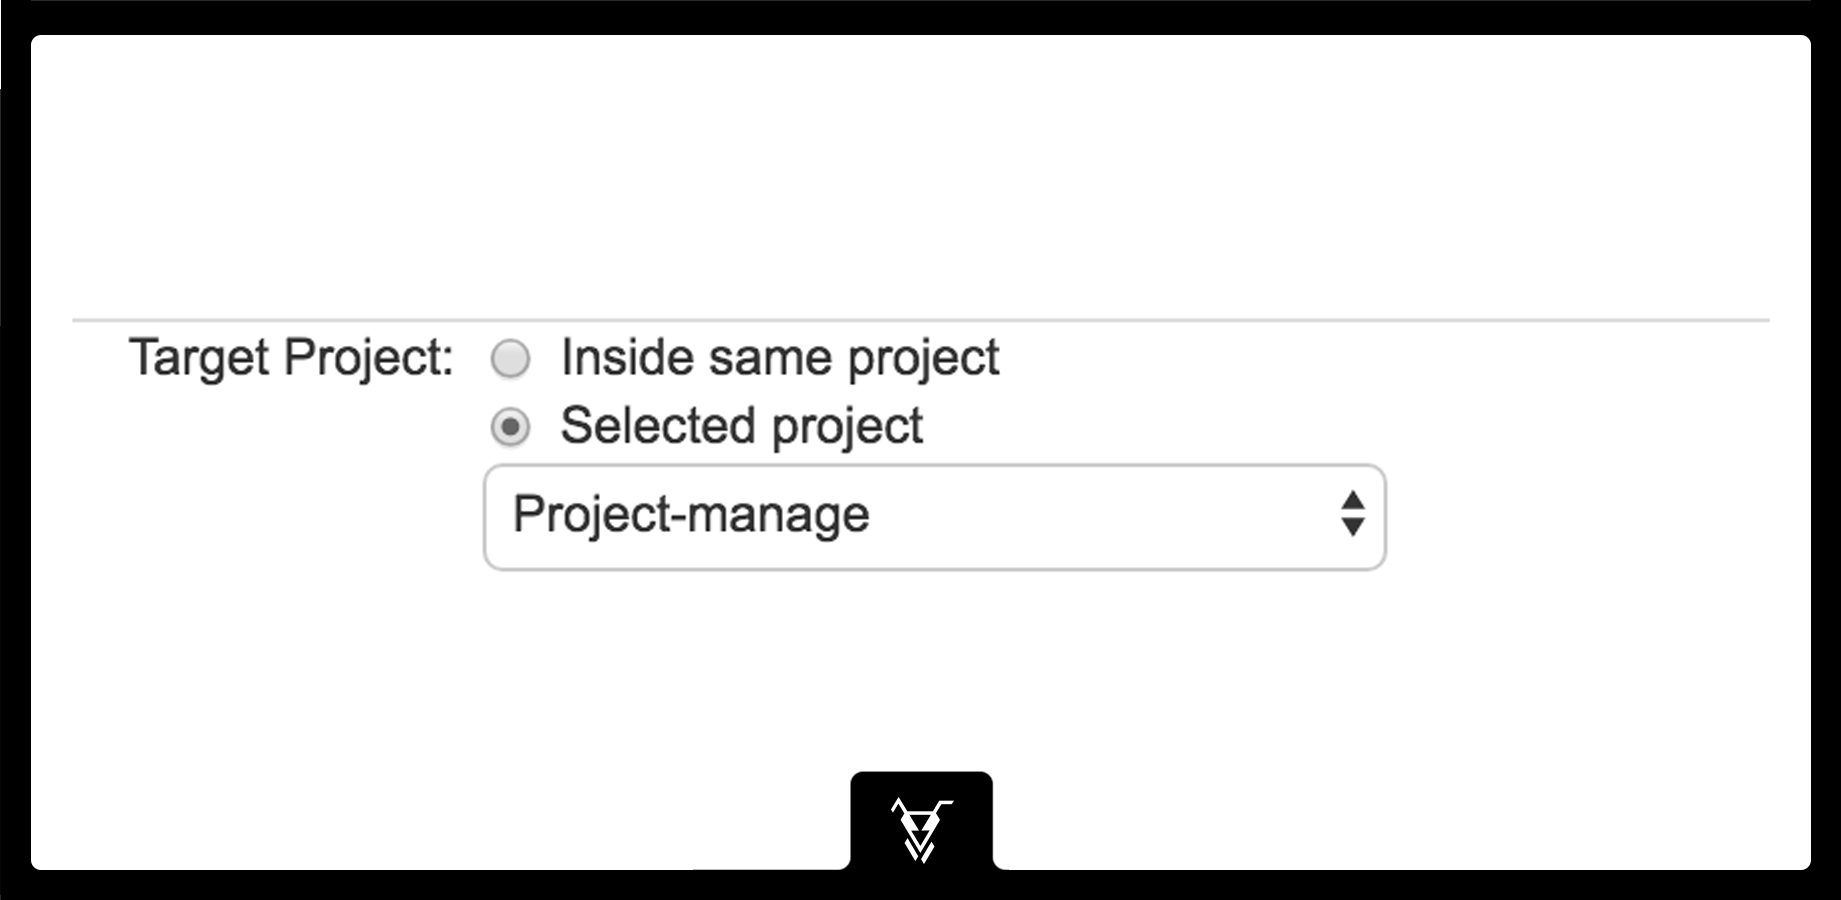
A new issue will be created in the selected project.
This Issue will be related via
Since JSU Cloud 1.1.0 The Create a Linked Issue post function allows you the create new issues, which are connected not only with an issue link, but instead also in a parent / sub-task, as well as epic / issue in epic relation.
See Releated Issues for more explanations on this topic (especially for creating sub-tasks).
Perform As User
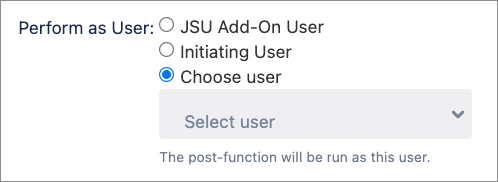
JSU Add-On User (default): The Perform as JSU Add-On User has all the necessary permissions to action all your JSU post functions. If you don't specify a different option, the transition on the related issue is performed as the JSU app user with its associated permissions. This option is useful for testing, and you can confirm the action in your issue activity.

Initiating User: The transition on the related issue is performed with the same user who triggered this post function on the origin issue. That user must have the necessary permissions on the related issue. In some restrictive setups, a user might not be allowed to perform the action or might not have permission to view the relevant project.
Choose User: Use this option to specify a different user account that has been granted the necessary permissions. Usually, this user account is assumed to be only technical (impersonation), with broad permissions, and not used for logging into Jira by coworkers.
In combination with the Permission Condition in native Jira, or the User Is In Any Users Condition from JSU, you can hide a transition from all users that do not have permission to execute it.
Initiating/Selected User
If you configure your post function for either the initiating user or a selected user, the relevant issue fields must be included in the associated issue screen.
For example, if you create a rule that updates a field in a related issue, the field must be included in the target issue Edit screen. Similarly, if you define a rule that creates a new issue, or copies a field to a new issue, the field must be included in the Create screen.
Issue Type
A new issue type will have a particular issue type.
Be aware, that the issue type you configure here must be available in the target project.
Copy Field the Origin Issue to the New Issue
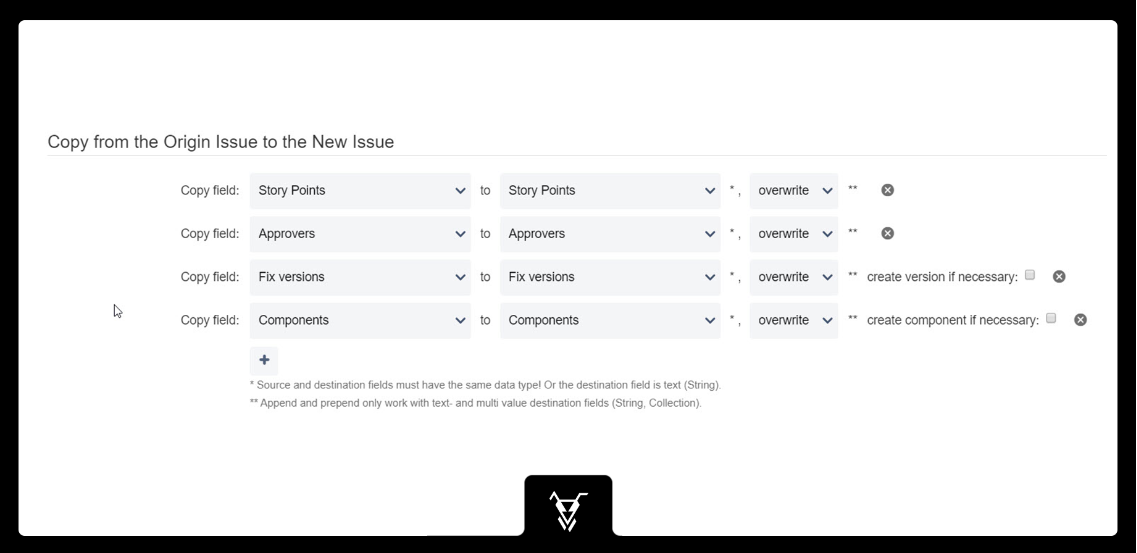
You can copy the value of a source field to a destination field. Click the + button to add additional field pairs to your configuration.
Keep in mind that not all conversions from source to destination field are supported, nor feasible. We can only ensure that it will work if the source and destination fields are of the same field type, or the destination field is a text field. Some additional combinations of different field types might work although not officially supported.

Overwrite / append / prepend
For text fields and other fields that can accept multiple values (like checkboxes), you can choose to overwrite, append, or prepend the new value to any existing value. For a text field, you can also choose a separator that is placed between the values (not shown in the screenshot above).
Create version if necessary
Imagine your origin issue has a version that you want to copy to the linked issue. If the destination field is 'Fix Version/s', 'Affects Version/s' or some custom field of type 'Version Picker', you can define that a new version will be created in the target project, if it does not yet exist. If you don't choose this option and that version does not yet exist, the user receives an error message and the transition completes.
A user needs the Administer Projects permission to be able to create a new version.
Create component if necessary
Imagine your origin issue has a component that you want to copy to the linked issue. If the destination field is Components, you define that a new component is created in the target project, if it does not yet exist. If you don't choose this option and that component does not yet exist, the user receives an error message and the transition completes.
A user needs the Administer Projects permission to create a new component.
Special sources
*** empty ***: The destination field will be cleared.*** last comment ***: The last comment from the source issue will be copied. In some cases that might be the comment from the transition screen, which the user just entered while performing the current transition.
Special destinations
*** new comment ***: A new comment will be created with the copied value. When you choose to overwrite to new comment, a new comment is created, enabling you to add multiple comments in one post function.
Examples:Copy Description to New Comment, overwrite→ creates a new comment with the description.Copy Summary to New Comment, append with separator ", "→ appends the summary to the previously created comment, so the comment will look like <Description>, <Summary>.Copy Assignee to New Comment, overwrite→ creates a new comment.
This configuration will result in two comments being created; one with the description and summary, and one with the assignee.
Copy Within The Origin Issue
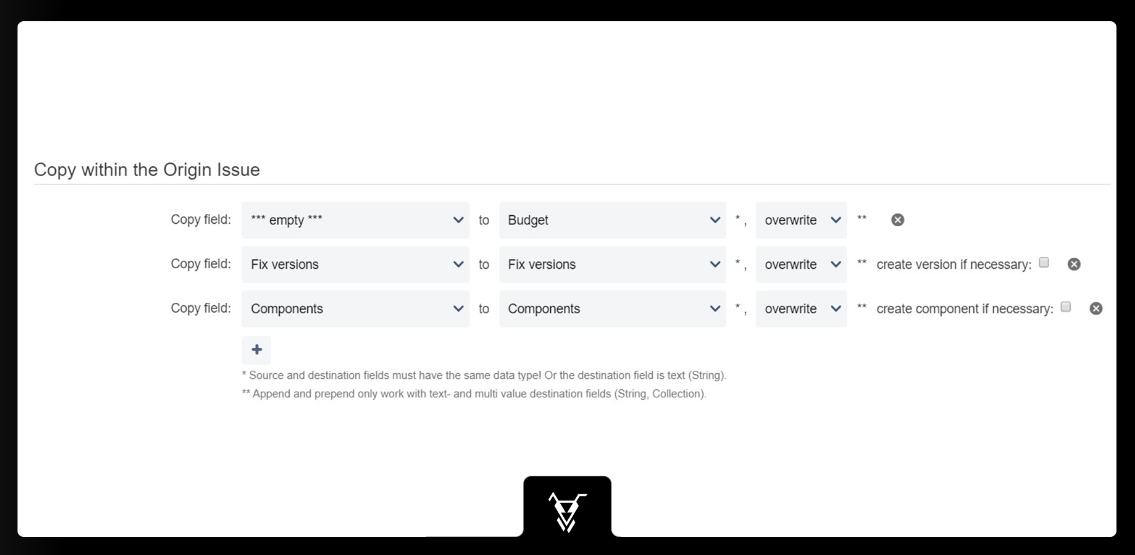
You can copy the value of a source field to a destination field. Click the + button to add additional field pairs to your configuration.
Keep in mind that not all conversions from source to destination field are supported, nor feasible. We can only ensure that it will work if the source and destination fields are of the same field type, or the destination field is a text field. Some additional combinations of different field types might work although not officially supported.
Overwrite / append / prepend
For text fields and other fields that can accept multiple values (like checkboxes), you can choose to overwrite, append, or prepend the new value to any existing value. For a text field, you can also choose a separator that is placed between the values (not shown in the screenshot above).
Create version if necessary
Imagine your origin issue has a version that you want to copy to the linked issue. If the destination field is 'Fix Version/s', 'Affects Version/s' or some custom field of type 'Version Picker', you can define that a new version will be created in the target project, if it does not yet exist. If you don't choose this option and that version does not yet exist, the user receives an error message and the transition completes.
A user needs the Administer Projects permission to be able to create a new version.
Create component if necessary
Imagine your origin issue has a component that you want to copy to the linked issue. If the destination field is Components, you define that a new component is created in the target project, if it does not yet exist. If you don't choose this option and that component does not yet exist, the user receives an error message and the transition completes.
A user needs the Administer Projects permission to create a new component.
Special sources
*** empty ***: The destination field will be cleared.*** last comment ***: The last comment from the source issue will be copied. In some cases that might be the comment from the transition screen, which the user just entered while performing the current transition.
Special destinations
*** new comment ***: A new comment will be created with the copied value. When you choose to overwrite to new comment, a new comment is created, enabling you to add multiple comments in one post function.
Examples:Copy Description to New Comment, overwrite→ creates a new comment with the description.Copy Summary to New Comment, append with separator ", "→ appends the summary to the previously created comment, so the comment will look like <Description>, <Summary>.Copy Assignee to New Comment, overwrite→ creates a new comment.
This configuration will result in two comments being created; one with the description and summary, and one with the assignee.
Asynchronous Execution
There is a fundamental difference between Jira Server/Data Center and Jira Cloud: In Jira Cloud, post functions of apps are executed asynchronously as a 'background job'. This means a post function will be executed after the transition has been completed on Jira Cloud.
Note the following behaviors of the asynchronous execution:
If you are using multiple post functions, there is no guaranteed order in which they are performed. They might be executed in a different order from the one you set up in Jira's workflow configuration. Therefore, you cannot rely on any result of a previous post function. Also, the order in which the post functions are executed might be different every time the transition is performed.
If a post function encounters a problem (due to misconfiguration or the current data of a Jira issue), the transition (and all other post functions) will be performed regardless of the problem.
The result of a post function might not be visible immediately in the browser.
There are no error messages displayed to the user.
Example
See the Use Case Testing and Fixing Bugs for a nice example, how several of our customers use it. The video on that page shows you the following sample configuration in action.
Supported Field Types
JSU supports many different field types; system fields, as well as custom fields.
You should be aware, however, that not all field types or all combinations are supported. We have tried to cover the most important field types but we are continuously adding more and improving how different field types are supported. We recommend you test JSU with fields to see if it is compatible with your system. Our evaluation license provides you with a 30-day free trial.